本文最后更新于 2024-03-22T23:32:59+00:00
服务器主要处理的是 I/O(输入/输出) 请求
简介 基础模块 1、fs:File System,操作文件的(常用) (常用) (常用)
V8 核心 :事件循环、内存原理
Node 版本管理工具:nvm (必装的)
使用 http 起一个简单的 server
创建文件夹
1 mkdir base && cd base && touch index.js && pnpm init
写入代码
1 2 3 4 5 6 7 8 9 10 11 12 13 14 15 16 17 18 19 20 21 22 23 24 25 26 const http = require ("http" );const server = http.createServer ((req, resp ) => {const { method, url } = req;setHeader ("Content-Type" , "text/html; charset=utf-8" );statusCode = 200 ;end (`<h1>hello,我是使用 http 创建的服务器,你是一个:${method} | ${url} </h1>` const port = process.env .PROT || 3001 ;listen (port, () => {console .log (`HTTP Server running on http://localhost:${port} ` );
运行node index.jsornodemon index.js
nodemon:一个 Node.js 开发工具,用于监视项目文件的变化,并在检测到变化时自动重启 Node.js 应用。npm install -g nodemon
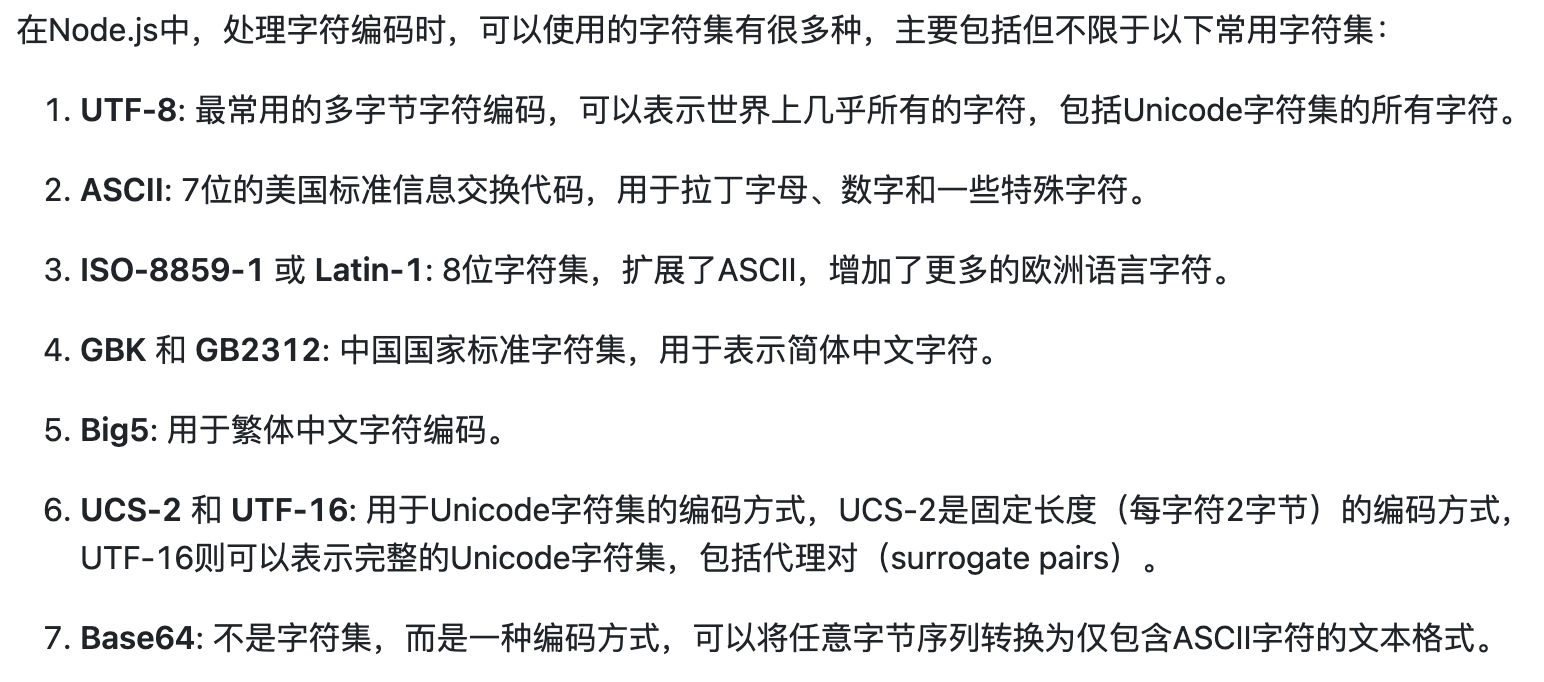
字符集 字符集:它定义了一组符号和编码规则,用于表示文本中的字符。
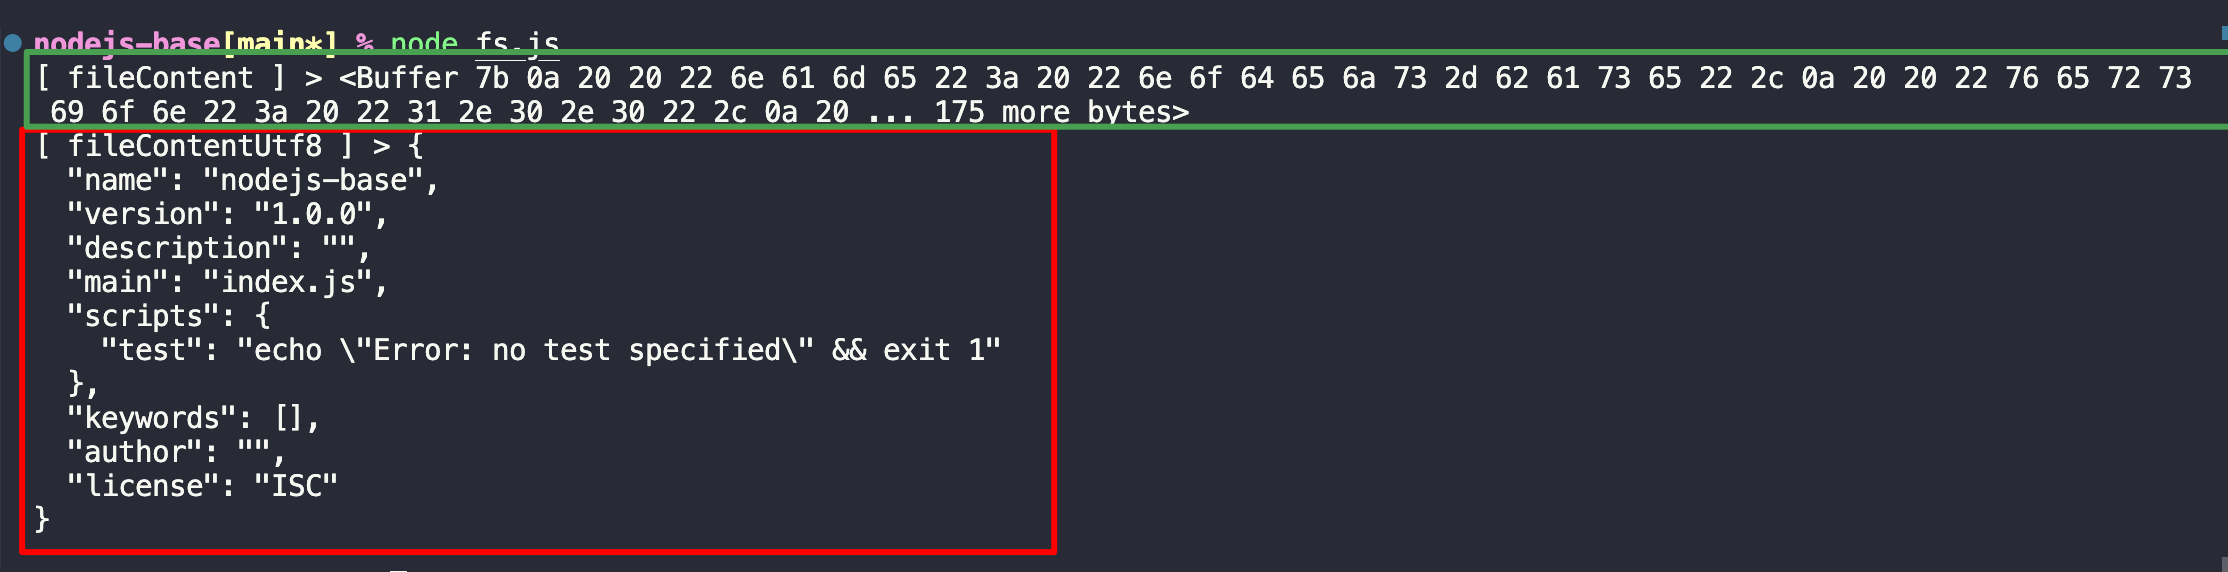
写一个读取文件的 js
创建文件:fs.js
写入代码:
1
2
3
4
5
6
7
8
9
10
11
12
13
14
15
16
const fs = require ("fs" );const path = require ("path" );function getFile (filePath ) {try {const fileContent = fs.readFileSync (path.resolve (__dirname, filePath));const fileContentUtf8 = Buffer .from (fileContent).toString ("utf8" );console .log ("[ fileContent ] >" , fileContent);console .log ("[ fileContentUtf8 ] >" , fileContentUtf8);catch (error) {console .log ("[ getFile error ] >" , error);getFile ("./package.json" );
运行node fs.js
readFileSync默认读取到的文件会以Buffer展示Buffer是 nodejs 中处理二进制数据的类,可将其转为不同字符编码(utf8/base64/ascii 等)的数据。Buffer.from('原内容').toString('编码')
Buffer 类 1 2 3 4 5 6 7 const Buffer = require ('buffer' )Buffer .alloc (size[, fill[, encoding]]) Buffer .allocUnsafe (size[, fill, ]) Buffer .from (str[, encoding])
Base64 base64 组成:小写 a-z,大写 A-Z,数字 0-9,符号 “+”“/”共 64 个字符(额外还有个“=”符号)00,构成新的二进制序列,然后转为十进制,最后在 base64 索引表中找该十进制对应的字符
一个字节 = 8 比特(bit),是由 8 个二进制位组成的,其范围是从二进制的 00000000 到 11111111,转换为十进制就是 0 到 255。
ASCII 字符集中的英文字符及其他一些符号可以用一个字节表示,因为 ASCII 字符集总共只有 128 个字符(0 到 127),小于一个字节所能表示的最大范围。
对于中文字符,以及其他许多非 ASCII 字符,由于字符数量众多,通常需要使用两个字节来表示。
Process 提供当前 nodejs 进程相关的信息process.env当前用户环境信息
1 2 3 4 5 6 7 8 {USER : 'hzq' ,PATH : '/Users/hzq/xxxx' ,PWD : '/Users/hzq/code/mianshi/7-1 nodejs 基础/nodejs-base' ,HOME : '/Users/hzq' ,_ : '/Users/hzq/.nvm/versions/node/v16.14.0/bin/node'
process.cwd()返回当前 nodejs 进程的工作目录
Crypto 在 Node.js 中,crypto 模块是内置的加密和解密库,提供了丰富的密码学相关的功能,包括哈希(Hashing)、消息认证码(MACs)、加密(Encryption)、解密(Decryption)、签名(Signing)和验证(Verification)等。以下是 crypto 模块中一些常见用法:
哈希(Hashes) :
1 2 3 4 const crypto = require ('crypto' );const hash = crypto.createHash ('sha256' );update ('some data to hash' );const digest = hash.digest ('hex' );
HMAC(哈希消息认证码) :
1 2 3 const hmac = crypto.createHmac ('sha256' , 'secret key' );update ('message' );const hmacDigest = hmac.digest ('hex' );
对称加密(Symmetric Encryption) :
1 2 3 4 5 6 7 8 9 10 11 12 13 const algorithm = 'aes-256-cbc' ;const key = crypto.randomBytes (32 ); const iv = crypto.randomBytes (16 ); const cipher = crypto.createCipheriv (algorithm, key, iv);let encrypted = cipher.update ('message' , 'utf8' , 'hex' );final ('hex' );const decipher = crypto.createDecipheriv (algorithm, key, iv);let decrypted = decipher.update (encrypted, 'hex' , 'utf8' );final ('utf8' );
非对称加密(Asymmetric Encryption) :
1 2 3 4 5 6 7 8 9 10 const { generateKeyPairSync } = require ('crypto' );const { publicKey, privateKey } = generateKeyPairSync ('rsa' , {modulusLength : 2048 ,const encrypted = crypto.publicEncrypt (publicKey, Buffer .from ('message' ));const decrypted = crypto.privateDecrypt (privateKey, encrypted);
签名(Signatures) :
1 2 3 4 5 6 7 8 9 10 const sign = crypto.createSign ('SHA256' );write ('some data to sign' );end ();const signature = sign.sign (privateKey, 'hex' );const verify = crypto.createVerify ('SHA256' );write ('some data to sign' );end ();const isVerified = verify.verify (publicKey, signature, 'hex' );
Http1.x VS Http 2 1、传输格式:1.x 使用文本格式;2 使用二进制格式(更高效)
V8 事件循环 nodejs 端的事件循环跟浏览器端的有点不一样。
node 的宏任务、微任务 常见宏任务:I/O callbacks、timer(settimeout、setInterval)、setImmediate
内存管理 在服务端内存是比较珍贵的,nodejs 限制了 64 位机器最大为 1.4 GB,限制了 32 位机器最大为 0.7GB
管理过程 采用 GC:Garbage Collection - 垃圾回收 来管理内存标记 :通过遍历GC Root来标记活动或非活动对象,遍历到的就是活动的,不能遍历到的就是非活动的清除 :将非活动对象清除
内存划分 堆:复杂类型;栈:基本类型;
分代垃圾回收 针对“堆”,划分了两个区域:新生代、老生代
新生代(存放短、容量小) 新创建的先放这里面。From 、To 区域From 区域 ,当 From 区域 满时,进行垃圾回收(标记清除),然后把存活的复制到 To 区域 ,之后翻转一下,即 From 变为 To , To 变成 From ,之后重复直到两次垃圾回收-标记清除 后还存在的就移动到老生代中
老生代(存放久,容量大) 多次在新生代里面存活的就晋升为老生代。标记-清除 或标记-整理 标记-整理: 基于标记清除,然后再整理了下内存碎片